Wednesday 30 August 2017

1 Sketch 2 ways, His and Hers

Hi Guys, its Tanya here!

Today I'm going to share a couple layouts from a single sketch i created (could work great for a double layout). A his and Hers layout, simple to do if you switch the colors of your layout.


The products i used are 
White Watercolor Cardstock (this is my FAVORITE card to use for mixed media)
Random leftovers papers and titles from past kits
Washi Tape

To get started spritz page with water and then smoosh your ink pad onto a non-stick craft mat then smoosh your page into ink
flick with water and dry completely, then stamp randomly using the same color oxide ink

Next grab your sewing machine and add some stitching horizontally in black thread to add contrast and tear thin strips of Washi tape and stick horizontally randomly on page


Thats the background done!!
Now grab some paper scraps and build some layers, cut a tiny bit larger then your photo, 

Once that's all done stick the photo stack to page and add your title.
Repeat this but in the other color for the next page

Here is the sketch i created for this layout

That's all from me for now,
 Thanks for stopping by!


Tuesday 29 August 2017

AUGUST CROP KIT - Lifes a Beach & Life is Sweet!!

Hello there, 
How is your day going? The days are flying by and soon we will be into Spring..  The warmer days and the colors of Spring make Spring one of my favourite times of the year!
However, I received some gorgeous papers that took my winter blues away in the form of the AUGUST CROP KIT which is a one off purchase which you can find in the SHOP AND CROP SCRAPBOOKING STORE HERE!!!  This is an amazing kit with colorful summery papers and lots of die cuts and embellishments in the ephemera pack to choose from.  I have two layouts to share with you and the first one has some simple instructions for you to create a layout too.

Everything I used is in the kit except for some old cardboard that I put under my photo for some dimension..  or foam tape would work too..

This is the layout that I created.

Life's a beach..


The photo I have used was taken at the Warwick Resort Fiji, so any of your beach holiday or travel photos would be fabulous for this layout..

Cut the strip off Item#2838 Cabana. I will be making a frame from this paper. Measure 6 cms around on each side making the marks on the pink stripey side, I am using the leaf side of this paper.

Using a craft knife or a box cutter cut carefully along the lines to create the frame for the layout. The middle section can be kept for another project.


Lightly distress and ink the inside edges of the frame.

I am using the Item #2341 Pool Party as the base of the frame, the green side. So to use the paper efficiently  I will cut out the outside and this will give  a frame to use on another layout. So I will do what I did before and measure 5cms around the Item#2341 Pool Party on the stripey side. Just to test that it will fit under the leaf frame lay the Pool Party paper under the leaf frame and make sure I can't see any marked lines.


Cut out carefully, and I am using the green side of the paper on this layout.
Run some thin double sided tape around the edge of the green paper.


Adhere under the frame. This is what the base will looked like.

I adhered some old cardboard under my photo and this was placed in the middle of my page.  I cut the large gold dot flower in half to place half on the top of my photo and the other half on the bottom right of my photo. I cut a strip of hessian 15 cms long and then in half width ways..  Pull some strands of hessian to add a distressed look. Tuck the hessian slightly under the photo along the bottom of the photo. Cut approx 8 cms of the string for each tag and add to the tags.  I added some journalling to the journal spot as well as a shell chipboard and also used a strand of hessian and made a bow. Add some banners on the side, a hibiscus flower and leaves on the right bottom of your photo, and some chipboard around your photo..

And some close ups to show details.


And a reminder of the finished layout..

Life's a beach.

The second layout I have created using this fabulous Kit uses the green frame left over from the first layout which is put on a piece of white cardstock from the Kit. I cut 4 rectangle pieces of paper from Item#2839 Summer Fun 4cms by 18cms and used two of each side. These 4 pieces of paper were placed evenly spaced in the middle of the page and then my photo was placed in the centre of the  layout. The layout  was embellished using die cuts and  items from the ephemera pack.  The products that I used that were not in the Kit was glitter glue, a flower punch, foam tape, an edge punch and a black marker.

Some closer views.
A cluster of embellishments..

Is that Flamingo cute or what!!?? The flowers were created using a flower punch and papers from Item#2837 Feeling Good.

Check out that cool ribbon!!!

Life is sweet!
I have used a black marker pen to outline the edges of the papers to make them stand out more. Such summery and pretty papers in this kit..  There is still more product left and I will share with you what else I create in my next blog post..  You can purchase this wonderful Kit at the SHOP AND CROP SCRAPBOOKING SHOP - HERE!!! And remember to pop the code LC5 on your order for a sweet discount of $5.00.

Have a happy scrappy day!



Monday 28 August 2017

'Summer Loving' By Elisa Ablett

Hi everyone,


Elisa here from the design team back with a simple tutorial using the new Tim Holtz Distress Ink Oxides to make a mixed media layout using the leftovers from the August Crop Kit and a few things from my stash.

The Crop kit is chock full of amazing papers and embellishments and so far I have made 4 layouts out of it with leftovers !

If you are after Oxide inkpads or a Crop Kit order through
Kylie at the shop and use the code EA5 to receive a discount on me 😀😀

Kylie and I have come up with a special bundle deal for customers - Buy all 12 colours in series 1 and series 2 colour releases for a special price and receive an even further discount if you use the code EA5 just message Shop and Crop Scrapbooking for the details!!!

Here is my layout, a mixed media beach inspired layout.


Let's Get on with the tutorial!

I picked these lovely four beachy colours and grabbed my trusty water spray bottle to begin.

If you are unsure what the Oxide inkpads are and what makes them so crazy special, this is a description coming from Ranger and Tim Holtz -

"Tim Holtz Distress Oxide Ink Pads are water-reactive dye & pigment ink fusion that creates an oxidized effect when sprayed with water. Use with stamps, stencils, and direct to surface. Blend using Ink Blending Tools and Foam. Re-ink using Distress Oxide Reinkers"


Because they have pigment ink blended in with them they will stamp with a fine image, they are opaque so will show up perfectly on a dark surface, you can also layer the colours on top of each other and they still retain the colours and do not turn into brown smoosh. And the best thing is they still react with water like the Distress Ink pads.

I will be showing you a quick and simple tutorial on how to use these wonderful inkpads and how to apply them to a mixed media layout...


Step 1 - Grab your ink pad and smoosh it or wipe it onto your mat (special crafters mat that can be wiped over) spray the colour with water liberally to create large droplets


Step 2 - Turn a piece of mixed media cardstock over the colour on your sheet and place it on the colour. Now to get the droplets you can just pull the sheet back up without rubbing the back of the sheet with your hand or you can rub the back of the sheet to get a different look. Pull the sheet off the colour and dry with a heat gun.


Step 3 - While you are drying with your heatgun, grab a water spray bottle - the distress spray bottle is the best for this job as it releases rather large drops and spray onto your sheet over the colour and you will get this lovely oxidised droplet effect. 


Step 4 - After your first layer of colour, you can now add layer after layer using the same technique!! you will get a multi colour effect with lovely droplets and crazy oxide effect.


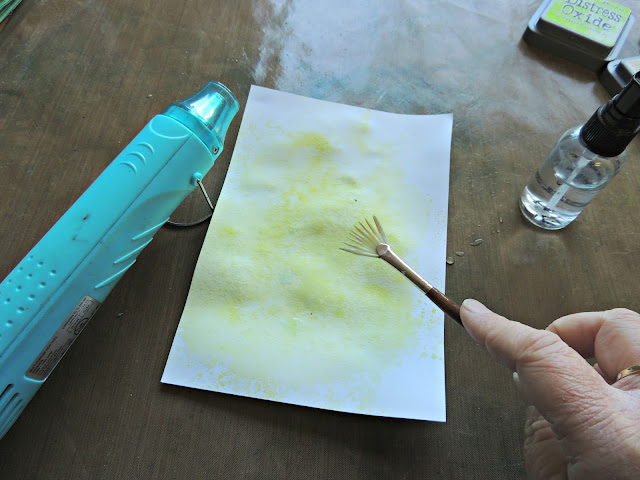
Step 5 - At the end you can also add another technique using a fan brush. Smoosh your colour onto your mat, add the water and then using the brush instead, dip it into the colour and tap generous droplets of colour onto your page and dry with a heatgun.

Below is a few examples of the end result of these techniques! perfect to use on a beach inspired layout ....right ??


Here is a few photos on how I incorporated these techniques on my layout.


Adding background colour to my page using the smooshing on the mat technique.


Adding some droplets of Antique Linen Oxide Ink pad to my page.


Use the inkpads to cover wood veneer or chipboard and use embellishments like DIY hearts from Charms Creations to mop up the colour on your mat and they will match your layout!!


I also used the technique on a couple of die cut square frames, which is a different and unique way of colouring and adding them to your page.


Add some stamping over your frames...


And here are some close ups of the finer details 


Well that's it from me today, i hope you have enjoyed the tutorial and insight into how you can incorporate simple yet effective techniques into your layouts.


Hugs 

Elisa xx


Sunday 27 August 2017

i love my father and so sweet

                       hi Heidi here today  my first page I have used the kaisercraft range
                                                      antique bazaar collection pack
                                                       and some a2z scraplets chippies


                               this page ive used the sage and grace kaisercraft
                                                         collection pack and collectables

come along and have a shop we have awesome kits etc in store
my discount code is HW5


Saturday 26 August 2017

Exclusive Stamping....4 ways by Sarah Rosse

Hello crafty friends, Sarah here with a quick technique based blog post using the awesome graffitti stamp, exclusively found only in the June Mixed Media kit. This kit and stamp was designed by the gorgeous Elisa Ablett! How lucky are we to have her on the design team. As soon as I spied the graffitti stamp, I knew I just had to have it. The range of Shop and Crop once off kits can be purchased online by clicking here.

So here are four ways you can use this graffiti stamp to create a cool background. This stamp is ideal for multiple prints side by side, as Elisa has done in her mixed media kit. You could use these techniques to make a card background or for a scrapbooking layout or pocket page. Everything you will need to try these out is pictured above - a heat gun, stamping block, ink, embossing powder (I used clear and gold) and paint. The Mixed Media kit comes with three small bottles of paint which are ideal.

First technique is simply stamping with ink. Here I have stamped with black StazOn ink. You could however use any colour ink you like. I think multi coloured or an ombre inked look would look fantastic.
Secondly, I then added some clear embossing powder over the black ink while it was still wet and heated it with my heat gun. Shop and Crop have a wide range of embossing powders that can be found here. As you can see in the photo below, the embossing powder gives a shiny, slightly raised finish to the stamped image.
Continuning on with my love of embossing powders, this time I have applied VersaMark, stamped and applied gold embossing powder. This is then heated with a heat gun and wow, the shine is gorgeous! You can just imagine this on a wider background - lots of bling!
Lastly is stamping with paint....yes, it sounds messy and it can get that way, but the little bottles of paint provided in the Mixed Media Kit are ideal for this technique. The tips of the bottles make application to a small surface, such as a stamp, easy to do.
The lovely thing about paint is that you somewhat control where you place it. I say 'somewhat' because I find it does it's own thing and can move a little when stamping, depending on how much paint you put on the stamp. As you can see pictured above, I have used two colours, but imagine stamping with the colours of the rainbow! Could be alot of fun for a layout background.
Thankyou for joining me for today's technique - I look forward to seeing how you use your stamps to create funky backgrounds. Remember though, if you do want this exclusive stamp - be sure to order your Mixed Media Kit today and use the code SR5 for a $5 discount at the checkout!